Manuals and more NOW located at our new
AbanteCart Information Hub from WHY2
Important Notes:
1. Starting with extension version 1.2.15 we have adopted a license key for all our extensions. Your extension will only work if you have a validated license key entered for the location where your extension is installed. Refer to here for more details on how license keys work.
2. In our opinion AbanteCart v 1.2.14 is extremely problematic and requires a large number of patch files to work correctly. Our recommendation is to upgrade v 1.2.14 to AbanteCart v 1.2.15.
This extension v 1.2.15 is tested to work with AbanteCart v 1.2.15. It may work with AbanteCart v 1.2.14 if all the patch files have been updated but we don't recommend you using AbanteCart v 1.2.14.
This extension helps you to let customer build a gift.
- Allow Customers to Mix n Match & Buy Custom Product Boxes.
- Create multiple product boxes for your store.
- Dynamic Pricing Options i.e. Fixed or Per Product Price.
- Option to Sell Partially or Pre-Filled Boxes.
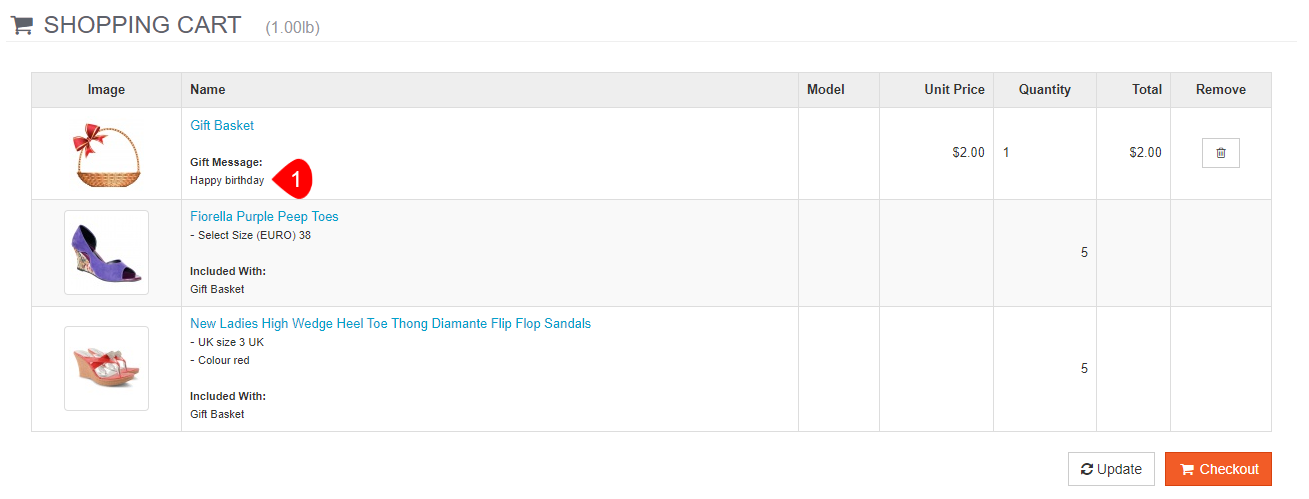
- Attach Personal Message with Gift Box.
- Two presentation views: List View & Grid View Layout.
- Handles products with options - size, color, etc.

1. This is the manual link.
2. This is extension quick note.
3. Turn ON to use the extension.
4. Enter you license code. Refer to How to obtain license code section for more information.
5. You can leave it blank if you don't want to set the extension run order.
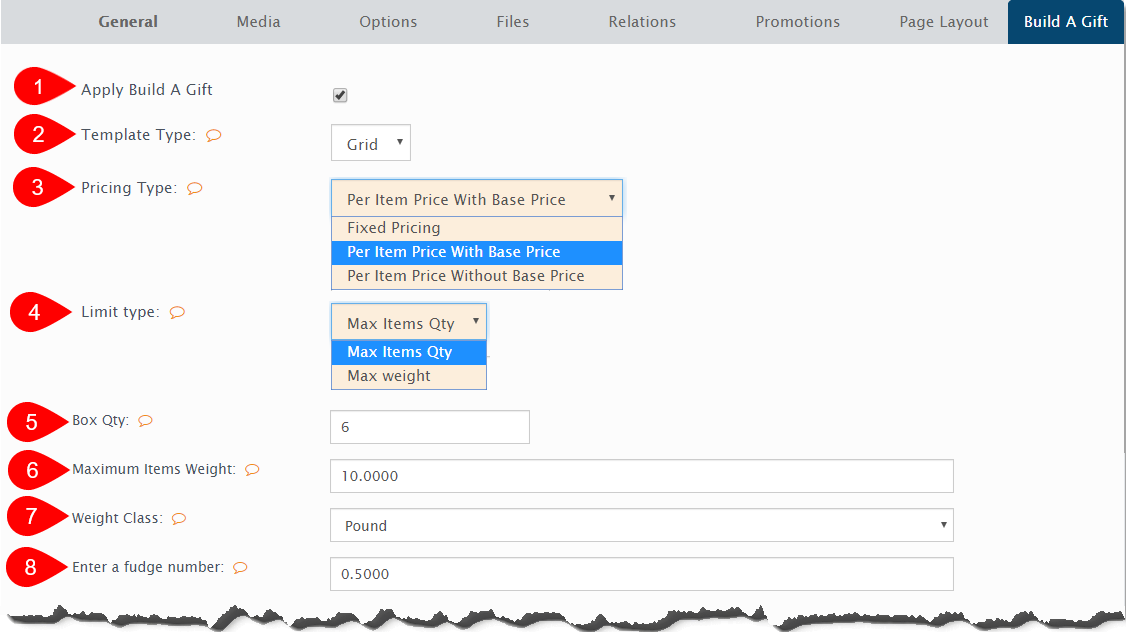
1. Check this to set product as a build a gift product.
2. Select template type: Select your desired template type.
3. Pricing type:
A. Fixed Pricing: Select this if you are charging a fixed price for this gift basket/box to your customer regardless the selected addon product price.
B. Per Item Price With Base Price: Select this if you are charging both gift basket/box along with the addon products to your customer.
C. Per Item Price Without Base Price: Select this if you are charging only the addon products to your customer.
4. Limit type:
A. Max Items Qty: Select this if you want to limit the basket/box based on max addon products.
B. Max weight: Select this if you want to limit the basket/box based on max addon products total weight.
5. Box qty: Enter the number of addon products that can be added to gift box.
Notes for number 6,8 and 9: These fields only show up if you choose Max weight as the limit type instead of Max Items qty.
6. Maximum Items Weight: Enter the maximum weight of addon products that can be added to gift box.
7. Weight Class: Select the weight class. This controls the weight for this build product selections.
8. Enter a fudge number: Enter a fudge number that is acceptable for extra weight.

10. Enter desired information that customer needs to reorder same gift message: This message will be displayed to customer. e.g. Sending another? Each gift needs to have a separate order - use the reorder button in your account to repeat this gift in a new order. By default, it will use "Each gift needs to have a separate order - use the reorder button in your account to repeat this gift in a new order" if you leave this field empty. And reorder button is available only if you have our Reorder extension installed.
11. Select box layout:
A. Vertical Layout: Select this if you want to show the box layout on the left side of the addon selection.


A. 2 Columns Layout: The extension will use 2 columns layout for the addon product layout.
B. 3 Columns Layout: The extension will use 3 columns layout for the addon product layout.
13. Gift box placeholder color:
14. Columns in product layout:
A. 2 Columns Layout: The extension will use 2 columns layout for the addon product layout.
B. 3 Columns Layout: The extension will use 3 columns layout for the addon product layout.
15. Allow Partially-Filled Box: Allow the purchase of box which has not been filled to its full capacity.
16. Minimum Items Weight Allowed: Set the minimum box weight to be allowed for purchased.

18. Gift Message Label: Set a label for gift message field.
19. Select sliding panel background color: Select the color that will be used as the sliding panel background color.
20. Select sliding panel background color opacity value: Select the opacity value. The smaller value makes the sliding panel background color more transparent.
21. Select quick view text color: Select the color that will be used as the quick view text color.
22. Select add to bag icon color: Select add to bag icon color. This is the rounded target icon.
23. Select the quantity stepper button and quick view button color: Select the color that will be used as the quantity stepper button and quick view button color.
24. Add-On Categories: Select the categories that you want to be available for customers.
Important Notes for number 25: These fields are shown based on the categories that you select via number 24. So, if you choose 3 categories, extension will populate 3 Exclude Products from category xxxx, and so on.
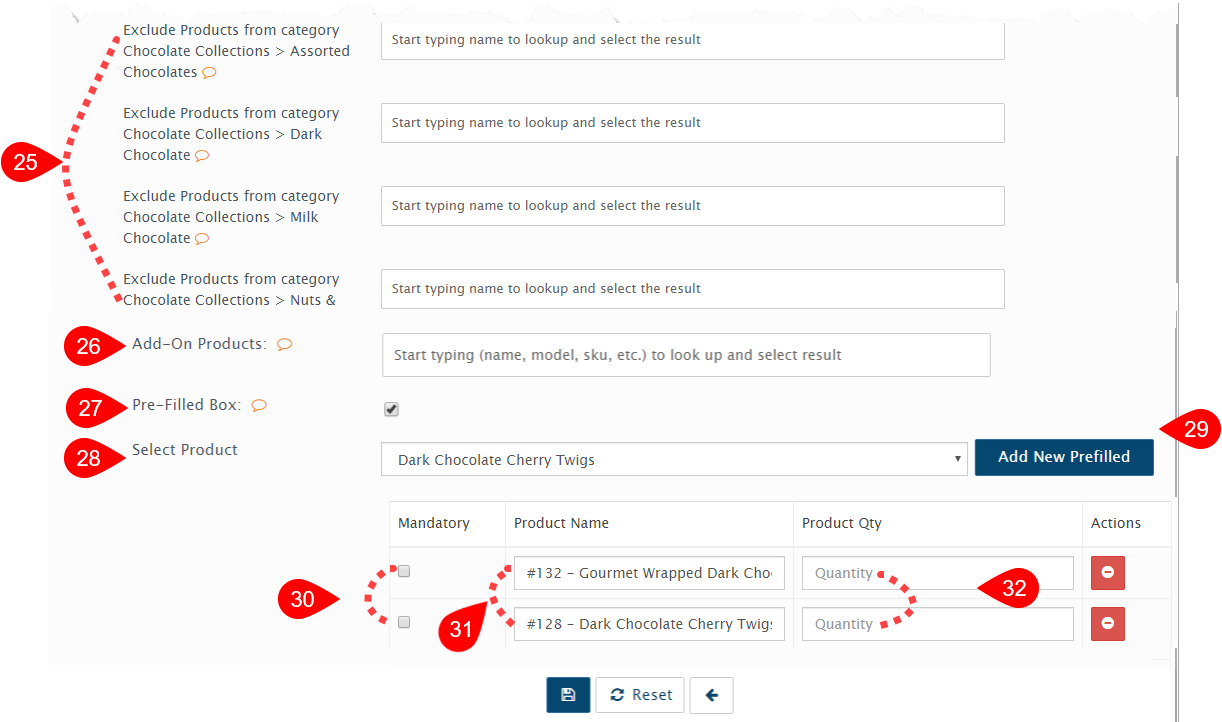
26. Add-On Products: Select the products that you want to be available for customers.
27. Pre-Filled Box: Check this checkbox to allow pre-filled box.
28. Select product: Select the products that will be used to pre-fill the box. The products that were available for selection are from the Add-On Categories /w Add-On Products above.
29. Click this button to add the selected product as a pre-filled box item.
30. Check the mandatory checkbox if customer is not allowed to remove the item from the gift box.
31. This is the product name generated from Product ID and Product Name.
32. Enter the qty of the item that will be used as the pre-filled box item.

1. Check this to set product as a build a gift product.
2. Select template type: Select your desired template type.
3. Pricing type:
A. Fixed Pricing: Select this if you are charging a fixed price for this gift basket/box to your customer regardless the selected addon product price.
B. Per Item Price With Base Price: Select this if you are charging both gift basket/box along with the addon products to your customer.
C. Per Item Price Without Base Price: Select this if you are charging only the addon products to your customer.
4. Limit type:
A. Max Items Qty: Select this if you want to limit the basket/box based on max addon products.
B. Max weight: Select this if you want to limit the basket/box based on max products total weight.
5. Box qty: Enter the number of items which can be added to box.
6. Enter desired information that customer needs to reorder same gift message: This message will be displayed to customer. e.g. Sending another? Each gift needs to have a separate order - use the reorder button in your account to repeat this gift in a new order. If you leave this field empty - it will use "Each gift needs to have a separate order - use the reorder button in your account to repeat this gift in a new order". And reorder button is available only if you have our Reorder extension installed.
7. Allow Partially-Filled Box: Allow the purchase of box which has not been filled to its full capacity.
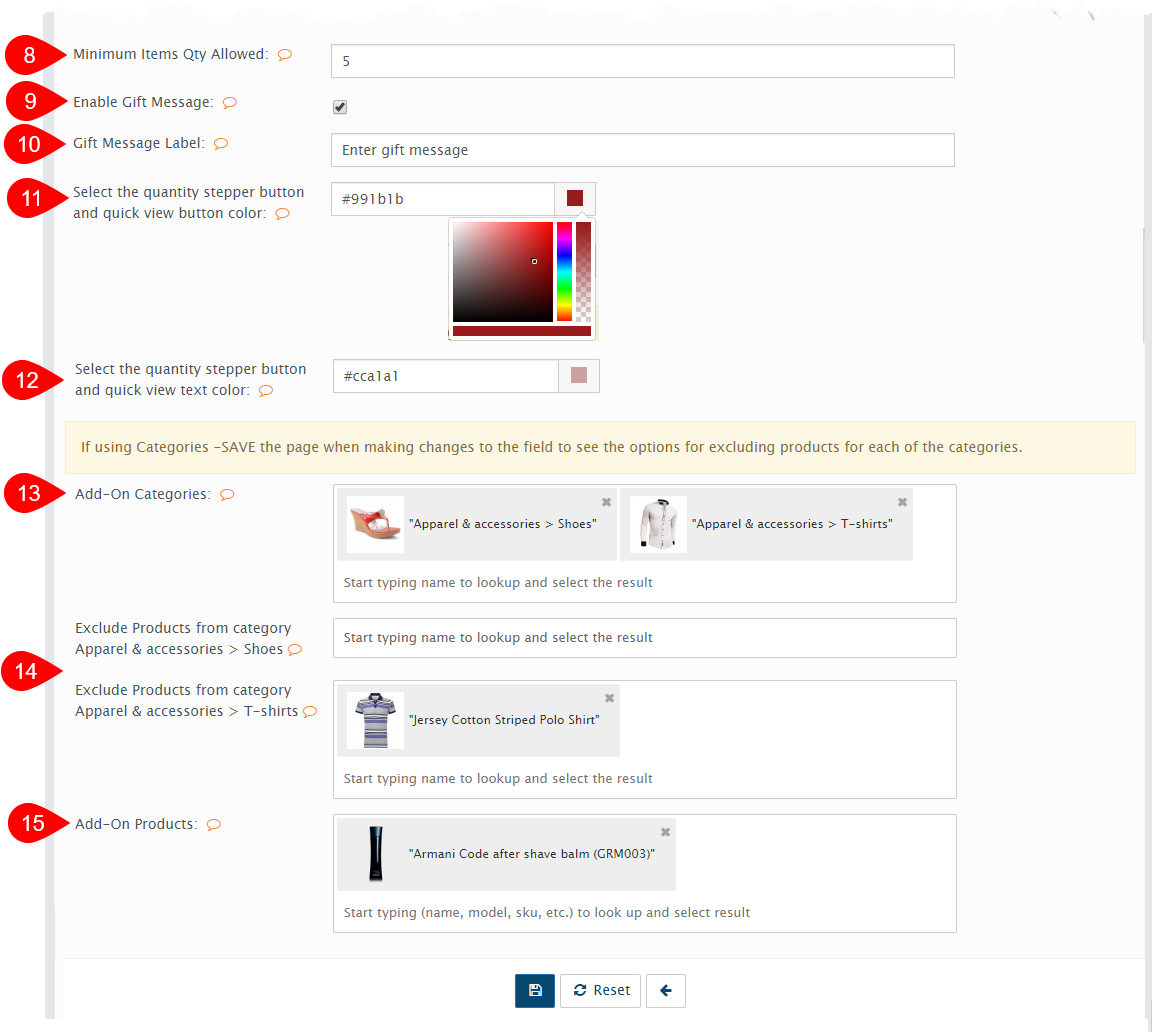
9. Enable Gift Message: Allow customers to send message along with the gift box.
10. Gift Message Label: Set a label for gift message field.
11. Select the quantity stepper button and quick view button color: Select the color that will be used as the quantity stepper button and quick view button color.
12. Select the quantity stepper button and quick view text color: Select the color that will be used as the quantity stepper button and quick view button color.
13. Add-On Categories: Select the categories that you want to be available for customers.
Important Notes for number 14: These fields are shown based on the categories that you select via number 13. So, if you choose 2 categories, extension will populate 2 Exclude Products from category xxxx, and so on.
14. Exclude Products from category: Select the products that will be excluded from the category that will be shown to customer.
15. Add-On Products: Select the products that you want to be available for customers.


2. This is the gift placeholder color that you set via number 13 on the grid layout setup above.
Notes for number 3: If you use pre-filled box and mark the items as mandatory, customer won't see this remove item icon when their mouse move over the pre-filled box items.
3. This is the remove item icon from the gift box.
4. These are the categories that you have chosen via number 24 on the grid layout setup above.
5. This is the sliding panel background color that you set via number 19 on the grid layout setup above.
6. This is the sliding panel background opacity color that you set via number 20 on the grid layout setup above.
7. The quantity stepper is shown to customer if the product doesn't have options.
8. This is the quantity stepper button and quick view button color that you set via number 23 on the grid layout setup above.
9. This is the Columns in product layout that you set via number 14 on the grid layout setup above.
10. This is the message that you set via number 9 on the grid layout setup above.
11. This is the current gift basket weight, it's automatically calculated based on gift basket item's weight.
12. This is the gift box maximum weight that you set via number 6 on the grid layout setup above.
13. This is the weight class that you set via number 7 on the grid layout setup above.
14. This is the fudge number that you set via number 8 on the grid layout setup above.
15. This is the gift message label that you set via number 18 on the grid layout setup above.
16. This field is shown if you enable gift message via number 17 on the grid layout setup above.
17. This message is shown to customer to notify them that they need to reorder same gift message as a separate order that you set via number 10 on the grid layout setup above.
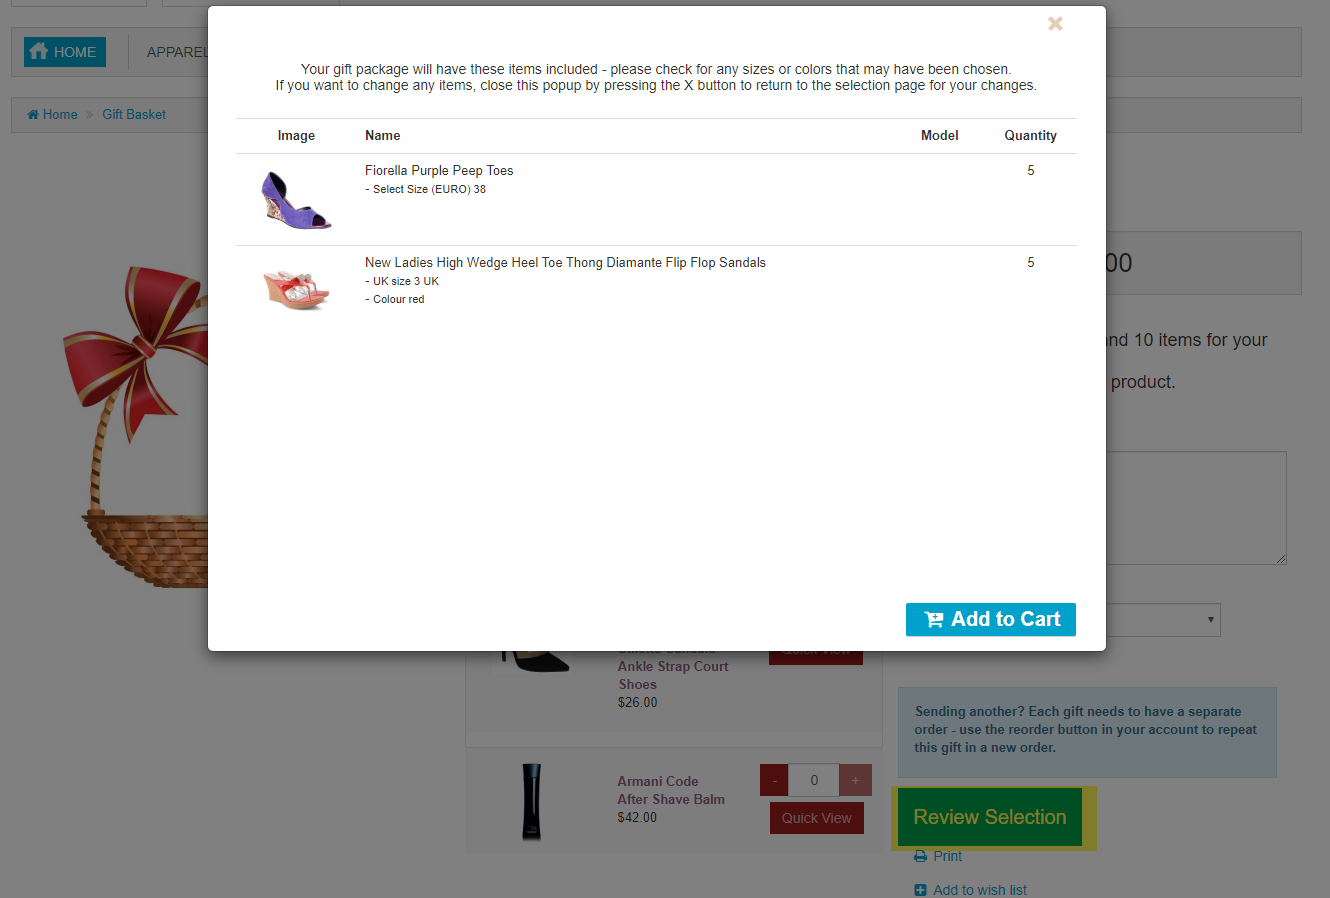
18. This button text will be changed dynamically to:
A. Fill Bag First: If customer select less than the box qty that was set or box weight.
B. Review Selection: If customer selection has met the box qty or box weight.
C. Bag weight exceed if you use Max Weight as the gift box limit type and the box weight exceed the maximum weight of the box.

2. This is the quantity stepper and quick view button color that you set via number 11 on the list layout setup above.
3. This is the quantity stepper and quick view text color that you set via number 12 on the list layout setup above.
4. This is the product(s) that you have chosen via number 15 on the list layout setup above.
5. This is the minimum items qty allowed that you set via number 8 on the list layout setup above.
6. This message is shown to customer if you allow partially-filled box that you set via number 7 on the list layout setup above.
7. This message is shown to customer to let them know how many items that they have choose and the box qty.
8. This is the box qty that you set via number 5 on the list layout setup above.
9. This number is used to let customer know how many items that they have choose and will be changed automatically when customer add or remove item from the gift bag.
10. This is the gift message label that you set via number 10 on the grid layout setup above.
11. This field is shown if you enable gift message via number 9 on the grid layout setup above.
12. This message is shown to customer to notify them that they need to reorder same gift message as a separate order that you set via number 6 on the list layout setup above.
13. This button text will be changed dynamically to:
A. Fill Bag First: If customer select less than the box qty that was set or box weight.
B. Review Selection: If customer selection has met the box qty or box weight.
C. Bag weight exceed if you use Max Weight as the gift box limit type and the box weight exceed the maximum weight of the box.


v1.2.15
2019 - 11 - 25
Initial Release for AbanteCart v1.2.15.