Important Notes:
1. Starting with extension version 1.2.15 we have adopted a license key for all our extensions. Your extension will only work if you have a validated license key entered for the location where your extension is installed. Refer to here for more details on how license keys work.
2. In our opinion AbanteCart v 1.2.14 is extremely problematic and requires a large number of patch files to work correctly. Our recommendation is to upgrade v 1.2.14 to AbanteCart v 1.2.15.
This extension v 1.2.15 is tested to work with AbanteCart v 1.2.15. It may work with AbanteCart v 1.2.14 if all the patch files have been updated but we don't recommend you using AbanteCart v 1.2.14.
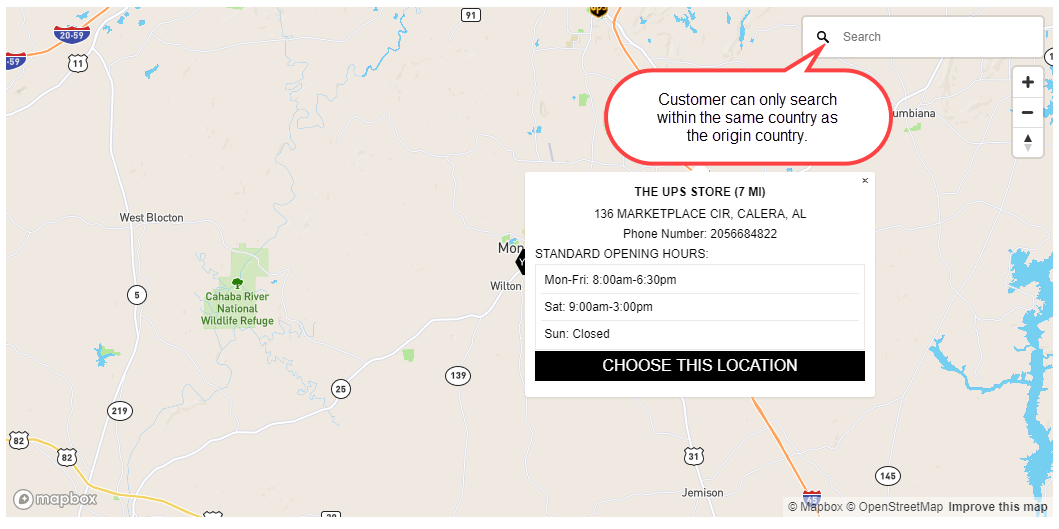
UPS Integration Plus: an enhanced UPS extension that supports all rates, including Dimensional Weight, Billable Weight, Oversize Package Surcharges and Send To Access Point Location. Access Point selection by customer is limited to Access Point locations within the same country as the shipping address.
Plus these added features:
1. Additional Weight field to easily add standard packaging weight, rather than having to do it on each item.
2. Additional Fee field to add upcharge - can be fixed dollar amount or percentage of shipping rate.
3. If enabling Ship Product Individually but without having fixed price rates are calculated separately for that item based on weight or dimensions. If item is ordered with other items is it correctly added to total shipping fees, but not included in calculation of other items.
4. Works well with the default free shipping, default per item shipping, default flat rate shipping.
5. Uses UPS address verification system to determine residential or commercial rate lookup on the checkout out page.
6. Allows the use of declared value of a shipment, including ability to set a Declared Nominal Value.
For more info about UPS Rates and other info, you can download UPS daily rates pdf file here
Important Note:

1. This is the manual link.
2. This is extension quick note.
3. Turn ON to use the extension.
4. Enter you license code. Refer to How to obtain license code section for more information.
5. Select your desired UPS icon that will be displayed to customer during checkout.
6. Turn ON if you want to set this extension as the default shipping one.
7. Select payment methods that will be only available for this extension.
8. You can leave it blank if you don't want to set the extension run order.

1. Quick How-to.
2. Extension Manual URL Link Button.
3. Test Mode: Use this module in Test (YES) or Production mode (NO).
4. Access Key: Enter the XML rates access key assigned to you by UPS.
Follow the steps here to obtain UPS developer username, password and access key.
5. Username: Insert your UPS Username here.
6. Password: Insert your UPS Password here.
7. Account Number: Insert your UPS Account Number here. This is mandatory if you are using negotiated rates.
8. Pickup Method: Select your pickup method.
How do you give packages to UPS (only used when origin is US)
9. Packaging Type: Select your packaging type.
10. Customer Classification Code:
00 - If you are want to get rates that is associated with Shipper Number.
01 - If you are billing to a UPS account and have a daily UPS pickup.
03 - If you do not have a UPS account or you are billing to a UPS account but do not have a daily pickup
04 - If you are shipping from a retail outlet (only used when origin is US).
11. Use Residential Rate As Default: Turn On if you want to use Residential Rate as the default instead of Commercial Rate on the view cart page.
The checkout page will validate the address whether it's residential or commercial
12. Negotiated Rates: Turn On if you have the negotiated rates enabled on your UPS Account.
Negotiated rates will be used - your shipper account must have negotiated rates activated AND you must use 00 in the Customer Classification code field.
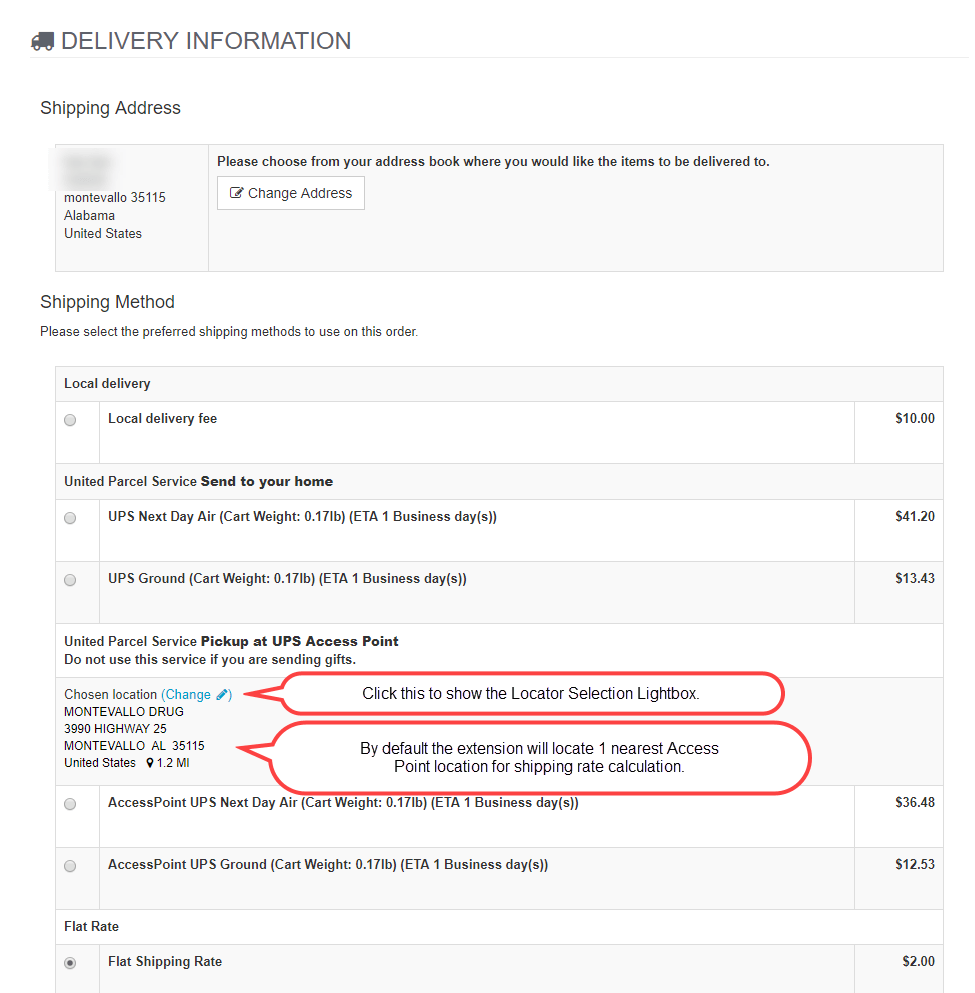
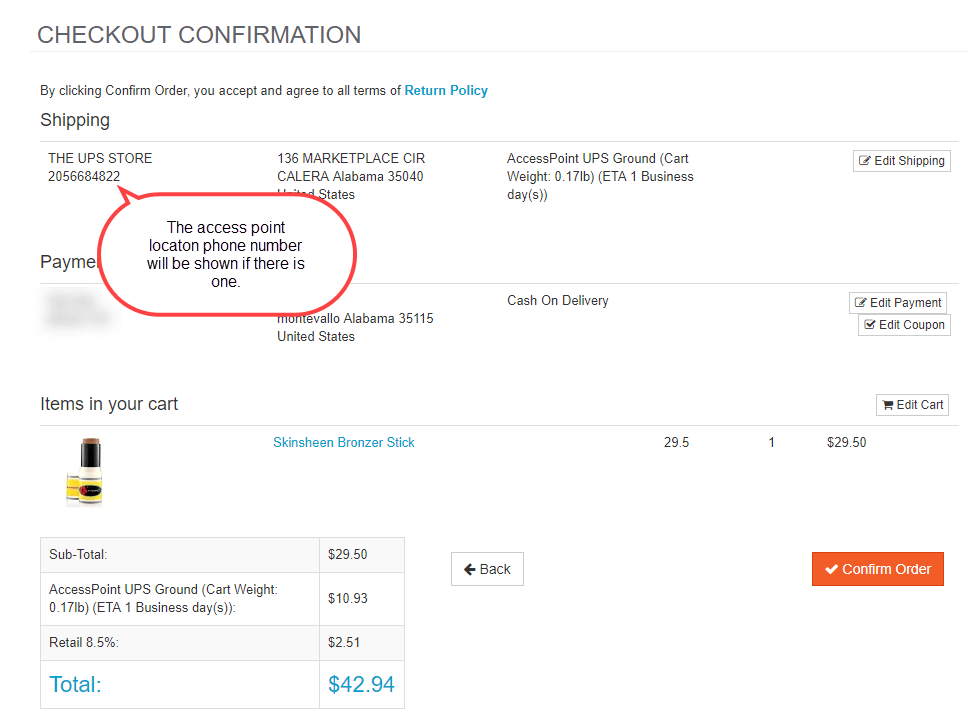
13. Enable Access Point: Turn On if you want to let customer pickup the package on nearest UPS Access Point.
14. Select distance unit used by Access Point: Select your desired distance unit measurement type. Miles / Kilometers.
15. Maximum Access Point locations number: Input Maximum Access Point locations to be shown for customer selection.
16. MapBox API Access Token for Access Point: Input your MapBox API Access Token for Access Point. This is required in order to show the Access Point locations in Mapbox map.
Click here to obtain the API Access Token if you already have a MapBox account or go here to signup if you don't have an account yet.
There are usage limits on using free MapBox Service. For more information click here.
17. Shipping Origin Code: What origin point should be used (this setting affects only what UPS product names are shown to the user)
18. Origin City: Enter the name of the origin city.
e.g. Montevallo.
19. Origin Zip/Postal Code: Enter your origin zip/postal code.
20. Origin State: Enter your (two/three letters) State code .
21. Origin Country: Enter your (two letters) Country code . For reference click here.
22. Test Your Connection: You can test if API credentials that you've entered are correct after you saved the credentials.
23. Services: Select the UPS Services to be offered (The list of services are different based on your origination).
Notes for number 24-27: If you are offering Local Delivery Services AND using more than one shipper you must enable Local Delivery Services on only ONE shipper. e.g. you offer FedEx, UPS and USPS, and also Local Delivery – you must enable Local Delivery on only ONE shipper: FedEx, UPS or USPS.
24. Enter Zip/Postal Code(s) eligible to use Local Delivery Service: Use commas(,) without space as the multi Zip/Postal code(s) separator, and no spaces within the Zip/Postal code(s). To define areas use asterisk (*) replacement - eg 351*,350*.
25. Local delivery fee: Enter the local delivery fee if you want to charge customer or leave blank if it is a free delivery.
26. Turn ON to show ONLY Local Delivery Services: Turn OFF if you want to show all shipping options including Local Delivery services.
27. Insert your desired text to be shown on cart page to let customers know about local delivery schedule or services: Insert your desired message.
Notes for number 28: If you are using more than ONE shipper and are offering any Free Shipping service, you must choose only ONE shipper for the Free Shipping. e.g. if using UPS , USPS and FedEx, Free Shipping can only be offered from one.

28. If using a Free Shipping option within your cart select which service you are using for the Free United States Shipping (If your location is in USA): Select the UPS Services to be offered for free shipping.

29. Show estimation of transit time: Turn ON if you want to show the estimation of transit time to your customer.
30. Number of days delay before ship: Number of day(s) delay before product is shipped after ordered.
31. Display Weight: Do you want to display the shipping weight? (e.g. (Weight : 0.17lb) )

Also, input on a product page will be used for that individual product rate look up. (You need to input individual product size and turn on the Ship Product Individually flag on product page.)
32. Dimensions Length (Optional): Insert your Box Length here.
33. Dimensions Width (Optional): Insert your Box Width here.
34. Dimensions Height (Optional): Insert your Box Height here.
35. Max Box Weight (Optional): Specifies the maximum box size (just the number). Once the maximum weight is met, the system will calculate shipping for 2(or more) boxes. UPS Access Point has different weight limits than regular UPS and the maximum is 20 KG (44 lbs.). Access Point locations will NOT be shown if a package exceeds the limit. Refer to this link for more information.
36. Tax Class: Choose your Tax Class. The tax is shown in a separate line on invoice.
37. Location: Choose your Zone.
38. Additional Fee Type: Choose the type that you want to use for the additional Fee. Fixed amount or Rate Percentage based.
39. Additional Fee: Insert your desired Additional Fee value that you want to charge to your customer.
e.g. The rate is $5.00, your fixed additional fee is $3.00, the rate shown to customer is $8. Or if you're using the percentage instead of fixed rate, and it is 10% from the rate, the rate will be $5.5. To use either fixed or percentage based additional fee, just enter the digits without the % or currency symbol.
40. Additional Weight: Insert your desired additional weight that you want to charge to your customer.
e.g. The weight is 0.26 lb and your additional weight is 0.50 lb, the weight rate will be 0.76 lb. And if showing shipping wt. in cart 0.26 lb is shown to customer.
41. Declared Value: Do you want to Declare Package Value? Yes(On) or No(Off)
The declared value of a package represents UPS's maximum liability for the package in the case of loss or damage.
For more information, visit UPS Declared Value Q&A.
42. Declared Value Nominal: Enter the minimum nominal that will be used to enable the Declared Value. (If you leave it blank, it will use USD $100 by default)
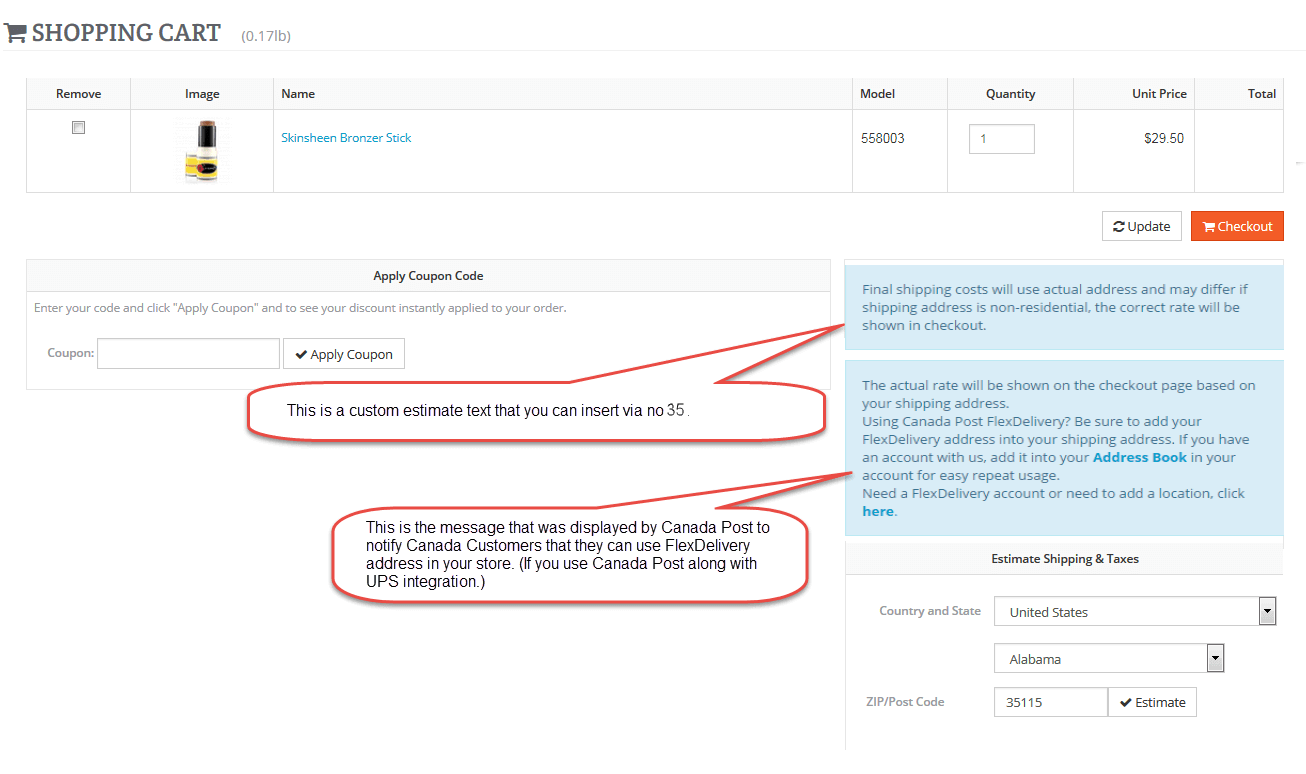
43. Estimate Message: Insert your desired text to be shown to customers to inform them that rate on cart page was using residential address based rate and not actual, the actual rate will be shown on checkout page based on their address. You also can state your delivery information here. e.g. orders received before noon are shipped same day, orders received after noon are shipped next day.
Finally Click the Save button and Turn On the extension.
Get MapBox API Access Token
 1. Copy the access token to field number 14 above in the setup page.
Checkout Page


FAQ
-
Getting different rates between ups site and your site
The rates on UPS is a retail price, you need to set the customer classification code to 04 in order to get the retail rates. -
Get 10002: The XML document is well formed but the document is not valid
Make sure you have setup the correct package type.
v1.2.15
2019 - 09 - 03
v1.2.0
2018 - 11 - 14
Initial Release.